
How does An Instant Pot's Timer Work?
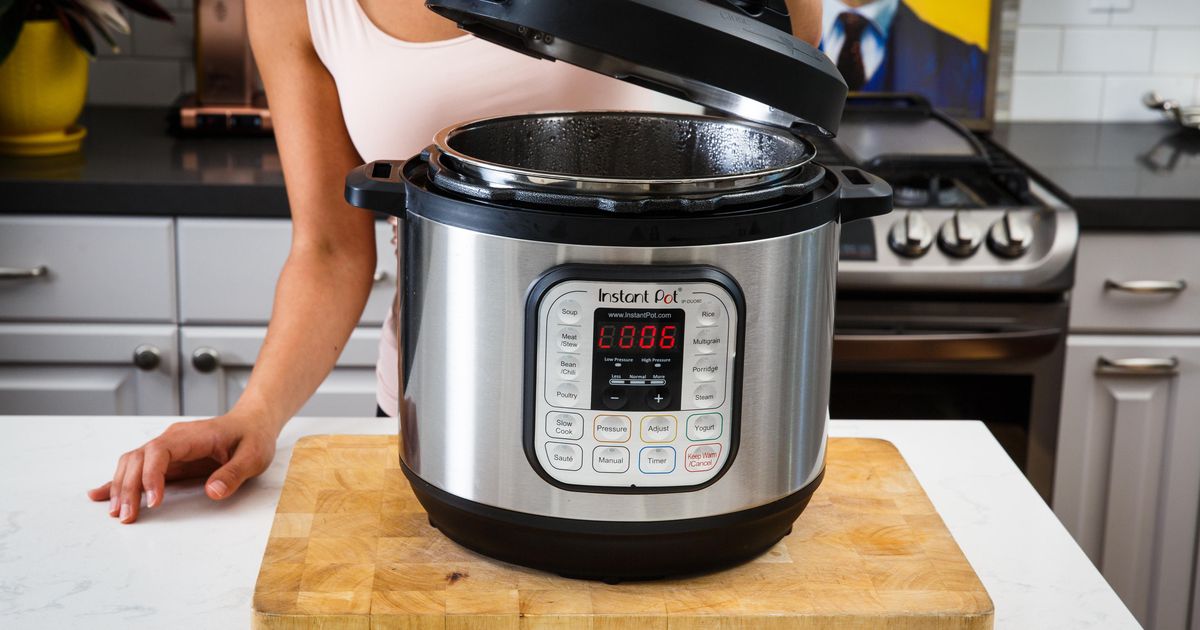
An instant pot is one of the most convenient kitchen gadgets. While it is commonly referred to as a pressure cooker in its most basic form, it is much more than that. An instant pot can sauté, slow cook, and steam vegetables and chicken, among other things. They make cooking a lot easier and significantly reduce the time to prepare meals.
In reality, you can easily create those time-consuming, like pulled pork in only an hour. The timer is one of the most significant features of an instant pot. It’s in charge of informing you how much longer you have to wait and ensure that your meal is always prepared to perfection. The timer appears daunting at first look, with so many buttons and options to choose from that many first-time users become perplexed.
While the buttons on your pot are labeled with the names of various foods, they connect to several minutes that you may manually alter. In this post, we’ll look at how an instant pot’s timer works, as well as how you may tweak it to get the finest meal possible. Like other timers on an instant pot, the timer on kitchen equipment generally counts down from a particular time. When the countdown is complete, the timer will turn off.
Alternatively, if the keep warm setting is selected, the heat and pressure are reduced to the appropriate levels to keep your meal warm. However, as you’ll see in this article, instant pot timers differ from those on conventional appliances in a few ways.
How to set an instant pot’s timer?
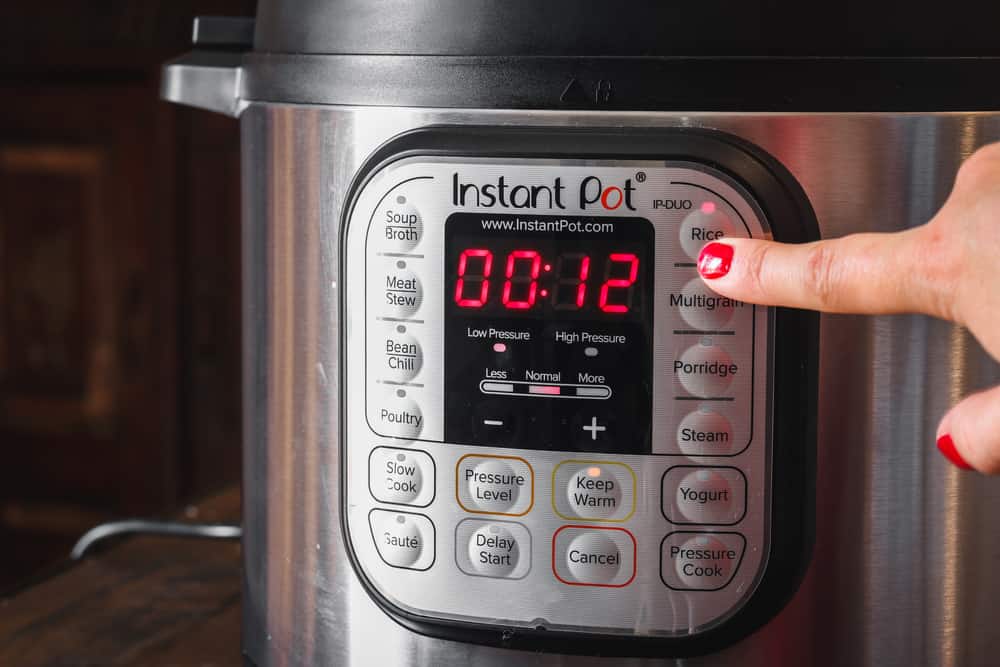
You’ll have to manually set the timer on the pot if you don’t want to utilize the presets for a particular meal or if you’re working with your recipe. Press the “manual” button on the Instant Pot’s screen to start the timer. Of course, you must do this after you’ve filled the pot with the necessary materials, put the pressure release valve to “sealing,” and adjust it to the proper setting. After pressing the “manual” button, you may modify the timer with the “-” and “+” buttons to the precise time you desire. It’s worth noting, though, that the timer’s countdown does not begin immediately.
So, if you set the timer for 30 minutes, you may have to wait closer to 40 minutes for it to be finished. This is the case because the timer begins counting down after the appropriate pressure has been built. Depending on your setting, the pressure might take anywhere from 5 to 10 minutes to build. Apart from that, don’t open the pot until the pressure is released, which might take up to 10 minutes. As a result, anytime you use your instant pot, you need to add 10-20 minutes to your cooking time. You may also use the settings on the pot to start a timer, which you can change manually by using the “-” and “+” buttons. The “Timer” button, on the other hand, isn’t used to set the cooking time; instead, it’s used to schedule how long the pot will delay heating, which is a handy feature if you want to make supper before work or ahead of time.
What should you do if your instant pot timer isn’t working?
Consider the following before you start seeking solutions because your timer isn’t working. Make sure you take your time. The timer only starts when the pot reaches the proper temperature and pressure. This may take some time, so be patient and wait to check whether the timer is malfunctioning. While this is the most popular treatment for a broken timer, it is recommended to get it repaired by a professional if the timer is genuinely broken. This is because repairing it without prior expertise or understanding of instant pots might cause more harm to your pot. So there you have it: the fundamentals of using an instant pot timer. An instant pot is one of its generation’s most helpful kitchen appliances. It enables individuals to prepare delicious, nutritious meals without waiting for hours. They’re also far more handy and safer than ordinary pressure cookers. So now that you know how the timer works and how to utilize it correctly, all you have to do is start cooking!
Most Popular Posts


Hey There! I am Agnes a Fitness Fanatic, Mom of two Amazing Daughters and a Kitchen and Cooking Enthusiast. I love blogging about Kitchen Upgrades, Appliances, and Cooking Tips, and this Blog aims to help you make wiser choices when it comes to your kitchen. Feel free to contact me if you need help!!!!!!