
How to preserve green chiles - The best way
If you grow your own chiles or have found a bulk supply at your local farmer’s market, you may need to preserve them to protect their flavor, heat, and nutrition until you are ready to eat them.
How are green chiles preserved? You can keep fresh green chiles in the fridge in an airtight container with kitchen paper inside. If stored properly, they can last up to 3 weeks. You can extend their shelf life much longer if you dry, freeze, pickle, or can the green chiles instead.
Each of these preservation methods requires different equipment and skills, and will have slightly different results. Deciding how to store your chiles will depend as much on what you have available to store them as on how you plan to use them in the future.
In this article, we’ll share step-by-step instructions to teach you exactly how to preserve green chilies – the best way, and almost any other!
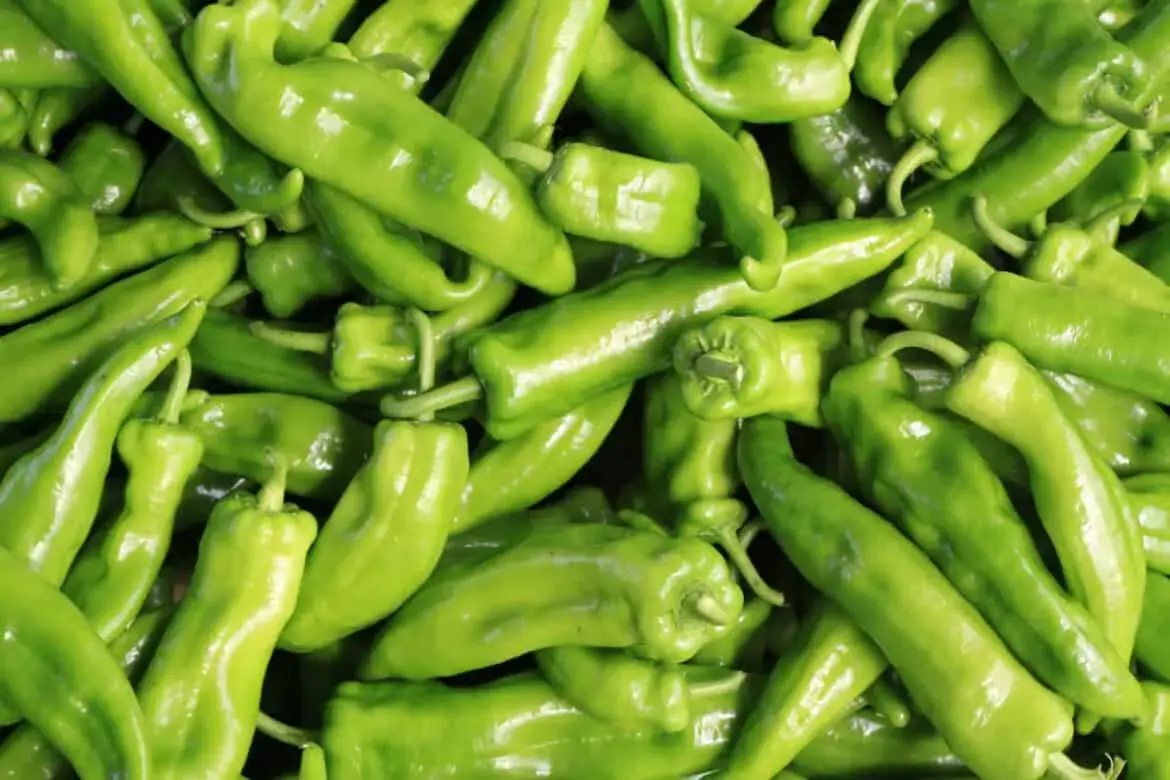
What are green chilies?
Most chilies are green when young and immature , which is why they are considered green chilies. They can mature to red, yellow, or even purple over time, but when young, they are considered green chiles.
In the case of hot peppers, the intensity of the heat develops as the fruits ripen , and they only reach their true heat potential when fully ripe. For this reason, green chiles tend to be mild in terms of heat and flavor.
Even when chilies are young and green, the hottest part of the plant is the seeds . Therefore, if you remove the seeds from the green chilies before consuming or storing them, their heat will be milder.
Green chilies are popular for flavoring a wide variety of foods and can be preserved in many different ways. They can be preserved fresh and raw, frozen, pickled, dried, or canned.
How you plan to use them in the future may affect how you store them. So let’s start exploring what to expect from different storage methods.
Storing Green Chilies
If you have more green chilies than you are willing to consume immediately, you have several options for preserving them for a longer period.
Here’s a quick rundown of the different storage methods for green chiles:
| storage method | How long | How to use |
| Fridge | up to 3 weeks | Fresh and raw or cooked |
| Dry | up to 1 year | It is best used as a spice |
| Freezer | up to 1 year | It is best used in the kitchen |
| Pickled | indefinitely | salads and garnishes |
| preserved in oil | 1-3 months | Potato salad, coleslaw, etc. |
| Canned | indefinitely | the way you like |
We’ll go over each of these methods in detail below, so read on for more green chile preservation tips.
Whichever method you choose, there is a universal truth that you should always keep in mind when working with chiles: wear oven mitts. Even mild chiles have a heat that can irritate your skin and eyes if they accidentally get their oils on you.
How to Store Green Chilies - The Best Way
If you have fresh green chilies that you plan to consume while they are young and soft, either raw or by cooking with them, it is best to store them in the refrigerator , like so:
- Place a sheet of kitchen paper in the bottom of an airtight container and place the green chiles in a single layer on the paper.
- If you have more chiles, place another sheet of kitchen paper over the first layer and spread another layer of chiles on top. Continue layering the kitchen paper and chiles until they are all nicely stacked on the inside.
- Close the container and store it in the refrigerator.
You can also store the green chiles in a resealable bag, but they are more likely to get crushed without the protection of the solid walls.
If you opt to keep them in a bag, it’s still a good idea to add a paper towel inside to collect moisture and try to layer them rather than crush them.
How long do green chiles last in the fridge?
Whole, well-stored, raw green chiles can last up to 3 weeks in the fridge. Although there is no guarantee that they will stay fresh that long. Some batches go bad quickly, and every fridge is different.
You will have to check them regularly. Always use chiles that seem to start to soften as soon as possible.
If you have sliced , diced, or any other type of chunks and stored the chiles, they will only last about 2-3 days before they start to get slimy and lose their crunch.
How to tell if green chiles are bad or spoiled
When green chiles start to go bad, it is usually very obvious.
The skin will begin to wrinkle and quickly turn into soft patches . If left for longer, those soft spots will discolor and turn to mush . This is the point at which you should throw them away.
You may also see visible mold or notice a rotten smell. This is also a signal to throw away the chiles immediately.
Storing green chiles without the fridge
If you won’t be eating your green chiles soon after picking or buying them, you have several storage options that don’t include the fridge.
Below you will find detailed instructions for drying, freezing, pickling, and canning green chiles, depending on your personal preference.
1. Dry the green chiles
If you plan to use your green chiles as a spice, drying them is a great way to preserve them for a long time.
Traditionally, the chilies are dried in the sun. If you live in a hot and dry climate, you can try it yourself. However, most home drying is done using an oven or dehydrator , which work well even in humid or cold environments.
what you need to know
Before you start drying the chiles, wash them gently in a saltwater solution to kill any bacteria that may be left on the pepper. After washing the chiles, dry them well.
You will also want to carefully inspect each green chile. If any look like they’re going bad, they’re not going to dry well. Discard the chiles that
- Are soft or have soft spots
- Begin to discolor or appear slightly gray instead of bright green
- Have an unpleasant, sour or pungent odor
It’s best to dry the chiles at a time of year when you can have fans running , preferably ones that draw air out of the kitchen through the window. Chili peppers, even the mildest ones, give off pungent vapors when heated. So if you use the oven to dry them, the air from your kitchen can burn you or irritate your eyes.
How to dry green chiles
If you use a food dehydrator, it’s best to look up the specific instructions for your model. Each machine will be slightly different and most manufacturers offer recommendations for a variety of food products and how to best handle them.
But if you plan to use your oven, follow these simple instructions for drying green chiles:
- Preheat your oven to 150 F.
- Line a baking sheet with parchment paper or a silicone baking mat.
- Wearing gloves, cut each chile in half and remove the stem and seeds.
- Place the chiles cut side down on the cookie sheet and put them in the oven.
- Flip the chiles every hour (consider shamelessly wearing glasses).
- It can take 6 hours or more to fully dry your chiles, but the final time needed will vary depending on the size of your chiles. So you will have to check them yourself and use your best judgement.
Well-dried green chiles can be stored in an airtight container in your pantry, away from direct light or heat, and well protected from exposure to moisture.
They should keep their best flavor for up to 1 year .
2. Freeze the green chiles
If you prefer to use your green chiles as fresh as possible, freezing them may be a better option than drying them.
Chiles freeze surprisingly well, although they will be softer when thawed. They will be best used when cooked in recipes (instead of garnishing your burgers or tacos). They will retain their flavor, including how spicy they are at the beginning.
How to Freeze Green Chilies
You can freeze the green chiles whole or sliced in whatever way you want to use them in the future.
Prepare the chiles however you like and follow these simple freezing guidelines:
- Place a layer of parchment paper or a silicone baking mat inside a cookie sheet.
- Spread your green chiles in a single layer on the tray.
- Place them carefully in the freezer, without covering the peppers.
- Let them freeze undisturbed for 1-2 hours.
- Transfer the frozen green chiles to a freezer-safe bag or container, making sure it is tightly closed.
Fresh and frozen chiles will maintain their quality for up to 1 year in the freezer. They can be used beyond that time, but the quality will degrade, losing heat, flavor and texture the longer they are frozen.
3. Preserve green chiles in vinegar
Pickling green chiles in vinegar is a great way to extend the life of your peppers almost indefinitely, while also infusing them with the delicious tangy flavor of pickled vegetables.
Pickling is one of the oldest methods of food preservation, as it uses an acid base to protect food from bacteria and mold.
It’s also relatively simple, requiring only a few ingredients, but it can also be very versatile if you’re interested in getting creative with your added spices and ingredients.
To preserve green chiles in vinegar, you will need
- canning jars
- Fresh and healthy green chillies
- Vinegar
- salt to pickle
You can also use additional ingredients to add flavor, such as garlic, bay leaves, dill, or any other herbs and spices that excite your taste buds.
How to “Quick Pickle” Green Chilies
You can “quick pickle” green chiles, but they will need to be stored in the fridge and eaten immediately.
If you want to store pickled green chiles in your pantry or basement, you’ll need to refer to the “How to Can Green Chilies” section below.
Here’s how to “quick pickle” your green chiles:
- Create a brine by dissolving the pickling salt in a solution of water and vinegar, heated over low to medium heat on the stove.
- Cut the chiles however you like and put them in the jar, along with any other spices or herbs you want to use.
- Let the brine cool and pour it over the green chiles, filling the jar so that all the chile slices are completely submerged.
- Close the jar so that it is airtight and let the chiles “pickle” for at least 3 days in the fridge. After 3 days you can try them to see if they are to your liking. Once you like them, they’re ready to eat at any time.
Pickled green chiles keep in the fridge almost indefinitely, as long as the lid remains tightly closed.
4. Canned green chiles
Green chilies and bell peppers are considered low-acid foods, which means they should be canned using a pressure cooker, and never in a water bath canner . This is the only way to ensure that you don’t allow bacteria to compromise your chiles.
For this reason, we recommend that you only can can chili peppers if you are already familiar with the safety procedures required for pressure canning.
What follows are just basic guidelines. These steps may not be enough for those new to canning, but they will do if you’re already familiar with the process.
The equipment you will need to can can green chiles includes
- A pressure canner
- Enough half-pint canning jars, lids, and bands to hold all the chiles
- Canning tools, such as a jar lifter, canning ladle, funnel, etc.
- Rubber gloves
- Cutting board and knife to prepare the chilies
- big and small pot
- large container
How to Can Green Chilies (Basic Guidelines)
- Before you start, you’ll need to make sure your canning jars, and bands, are washed and sterilized. Try to keep everything warm while you prepare the chiles.
- Leave them whole or cut them any way you like. Most canned peppers are roasted first so the skin is easy to remove, and then diced, but this is just a matter of preference.
- Once the green peppers are prepared, fill the jars, but do not squeeze them with peppers. Pour hot water over the peppers until there is an inch of headspace at the top.
- Tap the jar to make sure there are no air bubbles. Add the lids and rings, and transfer the filled jars to your pressure cooker.
- Follow the instructions for your model of pressure cooker to process the chiles correctly. (Every pressure cooker is a little different.) Once ready, allow the jars to cool enough to safely remove them from the pressure cooker.
- Have a tea towel spread out on your counter and covered with some cooling sheets. This will allow you to place the jars in a safe space to finish cooling completely.
- Be sure to label your freshly canned green chiles with the date and store them in your pantry cool and dry for up to 1 year.
If you are going to can the pickled green chiles, follow all the same steps but use the brine instead of just hot water.
5. Preserve green chiles in oil
Green chiles can also be preserved in oil and stored in the fridge or pantry for up to 1 month. Here’s how to do it:
- Wash the whole green chiles with a vinegar-water solution, rinse and dry well.
- Remove the stem and seeds, and cut the chiles lengthwise into thin strips.
- Prepare a vinegar and salt bath and soak the chiles for a minimum of 24 hours .
- Drain the chiles and pat them dry.
- Pile the chiles in a sterilized jar large enough for the amount you have, and cover completely with olive oil.
- Make sure the jar is closed with an airtight seal. Store it in a cool, dry place, like your pantry, for up to 1 month.
You can also store canned chiles in the fridge, but the oil will start to solidify and take on a less appealing cloudy consistency. In the fridge , green chiles in oil will keep safe and tasty for up to 3 months . But they are best if enjoyed within a few weeks.
Green chiles preserved in oil are great when diced in cold, creamy salads like potato salad or coleslaw.
How to preserve green chile paste
If you’ve purchased a green chili paste, it’s likely already packaged in a resealable tube or mason jar, like this green chili paste from Rani.
In this case, you just have to close the container again and store it in the refrigerator , following the instructions on the container.
Storing Homemade Green Chili Paste
However, if you’ve made your own green chili paste and want to make sure it lasts as long as possible, the best way to store it is in the freezer.
One of the easiest ways to pre-cut green chile paste is to freeze it in freezer trays (or ice cube trays).
However, you should use a tray that you don’t plan to reuse for ice in the future. The oils from the chiles can leach into the plastic. That can add amazing flavor to anything you use the ice tray for later.
Here’s how to freeze homemade green chile paste:
- To start, spray your ice cube tray with cooking spray. This will help prevent the pasta from sticking to the tray.
- Fill each slit in the cubes with 1 teaspoon of the green chile paste.
- Put it in the freezer, uncovered, for 1 to 2 hours.
- When each cube is well frozen, you can scoop out the frozen pasta and transfer it to a freezer-safe bag or container. They will stay neatly arranged in their individual portions.
Most Popular Posts


Hey There! I am Agnes a Fitness Fanatic, Mom of two Amazing Daughters and a Kitchen and Cooking Enthusiast. I love blogging about Kitchen Upgrades, Appliances, and Cooking Tips, and this Blog aims to help you make wiser choices when it comes to your kitchen. Feel free to contact me if you need help!!!!!!