
How To Store Yeast - The Ultimate Storage Guide
Yeast is one of those products that we never know what to do with. We find that we use a lot at one time or only use a little here and there.
But until now, we never knew if we needed to do something special to make sure the yeast is properly stored and preserved.
The thing about yeast is that it can become inactive if it’s not stored properly or if you’ve had it for too long in general. Yeast is also a product that can often last longer than the expiration date might suggest.
There are ways to test yeast and know for sure that it’s good before going any further.
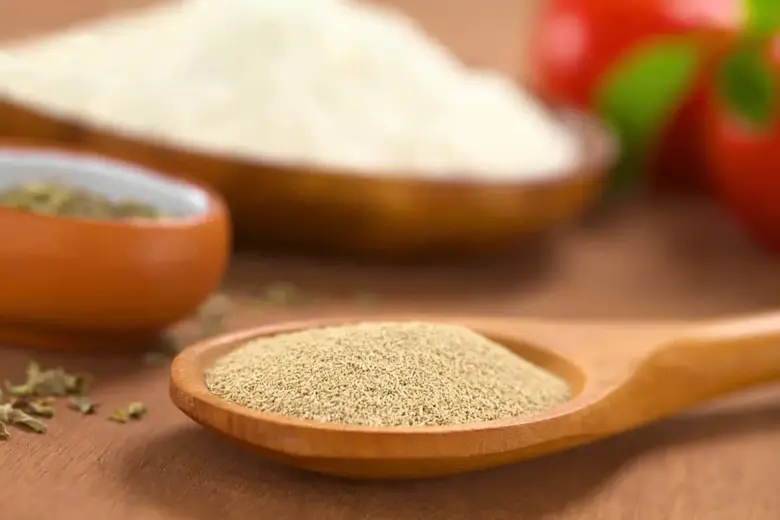
But how is yeast stored? Yeast is usually stored in the pantry or refrigerator, but it can also be frozen without killing the active ingredients for up to six months. You should know the properties of your yeast before storing it, but ultimately you should store it in a cool, dry place, in closed containers.
There are several different storage options, as well as some yeast storage tips to know, depending on the type of yeast you have.
In this guide, we will explain how to store yeast. We’ll cover many different variables and circumstances and give you the best details and tips for proper storage, in an effort to help you get the most out of your yeast.
Read on to find out how to store yeast, and much more!
The Ultimate Guide to Properly Storing Yeast
If you’re a baker of any kind, you’re probably pretty familiar with what yeast is by now. You probably know that if you try to omit yeast in a recipe, the results will probably not be what you expect.
When it comes to baking and cooking, yeast is a leavening agent . Yeast is typically used to raise breads and other types of baked goods.
The yeast works by transforming the fermentable sugar into carbon dioxide gas and ethanol which then causes a rise effect on the item in question.
We know yeast mostly from making bread or baked goods, as well as things like homemade pizza crust. However, creating things with yeast is not limited to homemade bread.
Think of things like muffins, pretzels, rolls, bagels, cookies, and even pancakes. They all need some sort of leavening agent to get them the fluffy, yeasty products they’re meant to be.
Without yeast, you will see that your product will be quite dense. It won’t ride up or fluff up at all. In fact, it will be quite heavy and thick.
Also, there may be a difference in flavor as well, although you may be more familiar with that flavor than you think. After all, there are unleavened breads. You’re probably familiar with things like pita and flatbreads.
An explanation of the types of yeast
There are two main types of yeast used in baking. There are four main types of yeast , including baker’s yeast, nutritional yeast, brewer’s yeast, and distiller’s yeast.
For the purposes of this guide, we will be focusing on baker’s yeast . As for baker’s yeast, there are three subtypes :
- Fresh yeast
- active dry yeast
- Instant yeast or quick rise yeast
Let’s break them down a bit.
Fresh yeast
Fresh yeast is a type of yeast that is mostly used by baking and cooking professionals who really understand all things yeast. This yeast is sometimes also called cake yeast or even compressed yeast.
Fresh yeast comes in the form of a block and not a powder. The block has 70% humidity. It is pale in color. This block is soft and crumbles easily. Its texture is coarser than baking powder options and it also has a stronger odor.
It is not considered a dry yeast. Again, it is the most used by professionals and can often be more difficult to find as well.
active dry yeast
Active dry yeast is typical yeast . It is the most common type of baking yeast, although instant yeast has won the day because it activates so quickly.
If you use active dry yeast, the fermentation time will be significantly longer. In fact, it’s probably double that of the snapshot.
This is the original yeast and is all natural. It is preferred by most bakers because it really does offer the best baking results. It provides you with the best baking process and the best flavor at the end.
Active dry yeast cannot be mixed with just the dry ingredients when mixing the recipe. You also have to mix it with water and dissolve it before adding it to the recipe.
Instant yeast or quick rise yeast
These terms are used interchangeably. You may also hear of bread machine yeast. This yeast is convenient to work with because it cuts fermentation time in half . Some instant yeast options only require 5 to 30 minute rise.
This is the type of yeast you will most likely use when using a bread maker. You may lose a small amount of flavor and even texture with instant yeast, but many people never know the difference. This yeast is slightly more potent .
Finally, you can add the instant yeast with your dry goods and continue mixing. It is not necessary to dissolve it in water to use it.
How to keep yeast alive
Perhaps one of the hardest parts of storing yeast is keeping it alive. Over time, the yeast may become inactive. The good news is that you can usually activate the yeast, which is why you add water to the active dry yeast to begin with.
Keeping yeast alive is a process that takes place primarily with wet yeast. You’ll notice that we haven’t specifically referred to wet yeast in our list above because it’s not one of the most common baker’s yeasts.
The exception is that fresh yeast has a high moisture content.
As for dry yeast, the best way to keep it alive and active is to store it in the fridge once opened.
In another section of this guide we will provide you with a specific process for this. You can also freeze the yeast, but there are a few things to keep in mind.
The terminology can be quite confusing because the goal is to prevent the dry yeast from becoming inactive or spoiling. The ultimate goal is to know that the yeast is going to do its job when you put it to use.
You can refrigerate or freeze all of the types of yeast we’ve talked about and this is the best way to keep them alive. Remember that you can also test your yeast before using it.
Freezing and storing dry yeast
Regardless of the type of dry yeast you have, you can refrigerate or freeze it. It has been questioned whether freezing yeast kills it. Freezing does not kill it BUT you must allow it to return to room temperature before activating or using it.
If you work with dry yeast, especially with active or instant yeast, you can store it in the fridge for up to 4 months and in the freezer for up to 6 months .
Here are the steps to freeze dry yeast , either regular or instant:
- If the container is unopened, you can keep it in the pantry until it is opened. The key here is that it should be in a cool, dry place and not anywhere it will be exposed to moisture or heat.
- Place the containers or packets of yeast in the fridge or freezer. If they are open, make sure they are closed properly. You may need to put the yeast in a freezer bag so that it seals well.
- Store dry yeast in the fridge for up to 4 months.
- Store dry yeast in the freezer for up to 6 months.
This is the question. Your yeast may not last as long. It is also possible for the yeast to skip these deadlines and last for years. Yeast is curious (and tricky!) in that regard.
To be sure, you can test your yeast before adding it to the recipe and be disappointed.
How to taste dry yeast
Testing yeast is a method of testing a small amount of yeast to determine if it is still active or good to use. Remember that if it is inactive, you can reactivate it.
- Take sugar, yeast and hot water.
- Mix 1 teaspoon of sugar and 2 1/4 teaspoons of yeast in 1/4 cup of warm water.
- Let the mixture sit for 10 minutes.
- If you can smell the yeast or see the mixture bubble, the yeast can still be used!
Testing the yeast is an easy way to double check that the yeast you are concerned about is bad to see if it can actually be used.
You don’t need to test the yeast each time you use it, but if you’re concerned that it’s been sitting too long, this process can put your mind at ease and prevent ingredients from going to waste with old yeast.
Can fresh yeast be frozen?
Guess! You can freeze fresh yeast the same way you freeze regular or instant yeast. Although the overall build is slightly different, it can also be frozen.
Here are the steps to freeze fresh yeast:
- Wrap the yeast tightly . It is best to wrap it in layers. We recommend wrapping with plastic wrap, and then a layer of aluminum foil, and then another layer of plastic wrap. It seems extreme, but it is necessary.
- Place the wrapped fresh yeast in a resealable freezer bag. Remove excess air as much as possible.
- Seal the bag and put the proper label and date on it.
- Store yeast in the coldest part of your freezer for up to 6 months.
When you are ready to use this yeast, you have to let it thaw in the fridge. It is best to let it thaw in the fridge overnight.
You should not thaw yeast at room temperature. It’s also best to only thaw the amount you need to use for whatever you’re doing at the time.
Using dry yeast after freezing
There is a specific trick for using dry yeast after it has been frozen: It is very important that you let the dry yeast come to room temperature before using it.
If you don’t let it come back to room temperature, your yeast may not work like it’s supposed to. Whether it’s regular or instant, let it sit at room temperature.
We recommend that you measure only what you need at the time and let it sit at room temperature for 30-60 minutes before proceeding to use the yeast as directed or needed.
Important tips to keep in mind for yeast storage
Here we have shared a lot of information about the storage of dry and wet yeast. The storage methods are quite similar, but there are some differences.
For example, wet yeast (fresh yeast) needs to be wrapped several times for proper storage, while dry yeast usually only needs a sachet or the original container.
In an effort to make this as useful to you as possible, here are our top yeast storage tips:
- Follow proper storage instructions: it is best if it is airtight and excess air is removed.
- Use the fridge and/or freezer to extend shelf life.
- Yeast may last longer than expected, but it may also not.
- Test the yeast if you are concerned that it is not active.
- Label all storage containers for easy reference.
- Let the yeast thaw in the fridge, but then allow it to come back to room temperature before using it.
Yeast actually goes dormant when stored below 50 degrees. This is why yeast can last longer in the freezer. Some experts will tell you that yeast can last indefinitely in the freezer.
It is possible, but we also want you to know that it is not guaranteed. The timeframes we have provided are considered the best chance of having a good yeast when you decide to use it.
Related questions
We hope you found this yeast storage guide valuable and informative. There are many things to consider and different types of yeast, so be sure to pay close attention to the tips and the yeast you are working with.
We invite you to review the following Q&A section for some additional details that might be helpful to you.
Are there substitutes for yeast?
If you find yourself in a tight spot and don’t have a good yeast on hand, there is a way to substitute it.
Normally, you can try mixing baking soda with some type of acid. Lemon juice, vinegar, or buttermilk are good options. Mix them in equal parts. Many times, you can also substitute an equal measure of baking powder for the yeast.
How is yeast activated?
Activate the yeast using 1/4 cup of warm water with the yeast. Do not use hot or cold water. You only want lukewarm water. Sugar is not necessary, but you can also add sugar if you wish. Let this mixture sit for about 10 minutes to activate the yeast.
Can I use regular yeast to replace the instant yeast?
Yes, you can substitute regular yeast for the instant yeast, but if you don’t allow the recommended fermentation time to pass, your item may not turn out the same.
If you substitute it in the bread machine, you shouldn’t notice any major issues with the overall results, although it may be slightly denser and the flavor could be slightly adjusted.
Most Popular Posts


Hey There! I am Agnes a Fitness Fanatic, Mom of two Amazing Daughters and a Kitchen and Cooking Enthusiast. I love blogging about Kitchen Upgrades, Appliances, and Cooking Tips, and this Blog aims to help you make wiser choices when it comes to your kitchen. Feel free to contact me if you need help!!!!!!