
Whole pork loin- Ultimate grilling guide
Almost everything in the world around us is diverse, whether it’s flowers or fruits, clothing or shoes, jewelry or food, or anything else. We have many options to explore and choose from when it comes to what we enjoy the most.
I enjoy learning about new things, and one of those things is undoubtedly food. I’m a food lover who enjoys trying new cuisines and dishes with a variety of flavors. Pork Loin is one of my favorite recipes, and I especially enjoy it when it’s grilled to perfection.
Something unique must be accomplished. To accomplish it the best way possible, eventually, some ideal grilling steps must be followed to offer it the best taste. But merely grilling it won’t do it justice; it won’t turn out the way I want it to.
As a result of my passion for pork loin, I’ve come to tell you all about the best grilling method for a whole pork loin so that you may prepare it yourself, taste it, and decide if you like it or not. I’m confident that most of you who consume meat would enjoy it.
In any case, prepare it according to the directions in this text and then make your decision. As a result, the focus of this essay will be on determining the Best Way to Grill a Whole Pork Loin.
So, what are we holding our breath for?
Let’s get this party started, shall we?
How to Grill a Whole Pork Loin at the Perfect Temperature
Everything has a set of steps to follow or points to keep in mind when it needs to be done correctly, and grilling a whole pork loin is no exception.
As a result, I’ll go over the essential elements to remember when grilling a whole pork loin later in this article.
Step 1: Decide on a cut.
The first and most crucial step is to prepare a piece of pork loin that will be grilled. Though this may seem self-evident, it does necessitate the mention of a specific aim. And the objective of this is to point out that Pork Loin and Pork Tenderloin are not the same thing. Even though they both sound similar, they are not the same piece. Both of these cuts come from below the pig’s spine on each side. Still, tenderloin is the most tender and is an extended, thin cut. At the same time, pork loin is cylindrical in shape and comparably thicker.
You’re ready to make the loin by removing the silvery-white sinew from above the meat once you’ve found the correct cut.
Step 2: Bringing the loin

The pig species has become leaner with time, requiring us to guarantee that the pork retains adequate moisture when cooked. Brining it is one approach to ensure this.
It begs the question of how brining is done and how it can aid in the preservation of moisture in the pig. Continue reading to get all of your answers.
The first step in brining is to make sure the entire loin is submerged. The water and the other ingredients must be brought to a boil and then simmered for about 5 minutes. Once this is completed, please remove it from the fire and set it aside to cool. The brine must be brought to 45°F, which can be accomplished with the help of a few glasses of ice. After that, put the brine in a plastic bag, shake it to blend everything together if you’ve added any spices, and then refrigerate it overnight.
One thing to keep in mind is that the plastic bag contains a liquid. So, if you fear the plastic bag might leak, or you can already see a leak from the bag, keep it inside a cup or a bowl, so it doesn’t damage the other items in the refrigerator.
This brining process will aid in breaking down the thick muscle in the meat and keeping it moist. A brine recipe could be as simple as a quart of water, a quarter cup of salt, and a quarter cup of brown sugar.
Step 3: Get the Grill Ready
If you’re using fire to grill it, it’s best to adjust the coal to create a medium and a hot side. The best method to achieve this is to preheat the grill to a high setting. Otherwise, heat the grill grate for a few minutes before placing the meat on it if using a gas grill.
This will be the grill where you will eventually place the meat to be grilled.
Step 4: Preparing a loin is the fourth step.
Now that the grill has been set up, it’s time to get the loin ready. The first step is to remove the meat from the brine solution we used to wet it. Using paper towels, pat this loin dry. The paste is now ready to be made. When making it, add a few drops of oil, kosher salt, and freshly ground pepper. Use five to six garlic cloves to make the paste, cut them, drag them with your knife, and firmly press the garlic with it.
It’s now time to massage the pork’s outside with the prepared mixture. We can add any other herbs we like, such as Rosemary if we want to.
Step 5: Grilling the Loin
The next step is to sear the outside of the meat. To do so, place the loin piece on the high-heat side of the grill and cover it with either aluminum foil paper or a turned-over metal pan. Allow it to roast for about five minutes before turning it once to ensure that all sides are evenly cooked.
After that, either transfer the loin piece to the cooler side of the grill or lower the temperature. Then leave it to roast for an hour to an hour and a half to an hour and a half to an hour and a half to an hour and a half Cover it with aluminum foil or an aluminum pan in the same way you did before.
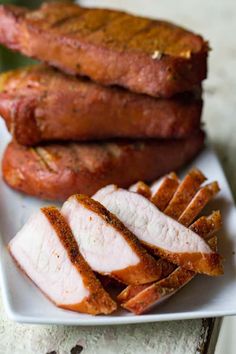
Make sure to turn the piece every now and then to ensure that it is well cooked on both sides. The optimal temperature for this is between 145 and 160 degrees Fahrenheit.
Now it’s time for the final step!
Step 6: Allow time for your loin to relax.

It’s crucial to remember that meat continues to cook for a few minutes after it’s been taken off the fire. Allow your dinner to rest for at least 10-15 minutes after roasting for roughly one hour at a medium temperature so that it achieves its ideal temperature.
This 10-20 minute rest period is particularly significant since it allows the meat to retain its juiciness and makes cutting it into pieces simpler. After that, you’re ready to serve the dish to family, friends, or guests. The appearance of it, as well as the aroma of spices, will make people’s lips swim and make them ready to try this delectable delicacy.
With this, the article’s goal of telling you about the best technique to cook a whole pork loin is accomplished. I hope you all have a good understanding of how to grill the Whole Pork Loin to perfection.
As a result, we’ve finally reached the end of the article.
Conclusion
Cooking has become a hobby for many people. Still, it necessitates an exemplary procedure for cooking everything in the most acceptable way possible to taste absolutely fantastic. This is what we learned about the Whole Pork Loin in this article. We figured out how to grill it the best way possible by setting down the six steps to make the grilling procedure a lot more accessible and more effective.
Thus, this article can be ended by stating that if the six tips mentioned above for grilling the Whole Pork Loin are followed to the letter, the best results will undoubtedly be obtained. So be sure to follow the steps carefully and then sit back and enjoy your meal. I’m sure you’d enjoy it in the end.
It brings the article to a close.
I wish you a wonderful day cooking and eating. Enjoy your meal with those you care about.
Most Popular Posts


Hey There! I am Agnes a Fitness Fanatic, Mom of two Amazing Daughters and a Kitchen and Cooking Enthusiast. I love blogging about Kitchen Upgrades, Appliances, and Cooking Tips, and this Blog aims to help you make wiser choices when it comes to your kitchen. Feel free to contact me if you need help!!!!!!